What is a Walkthrough in Apps
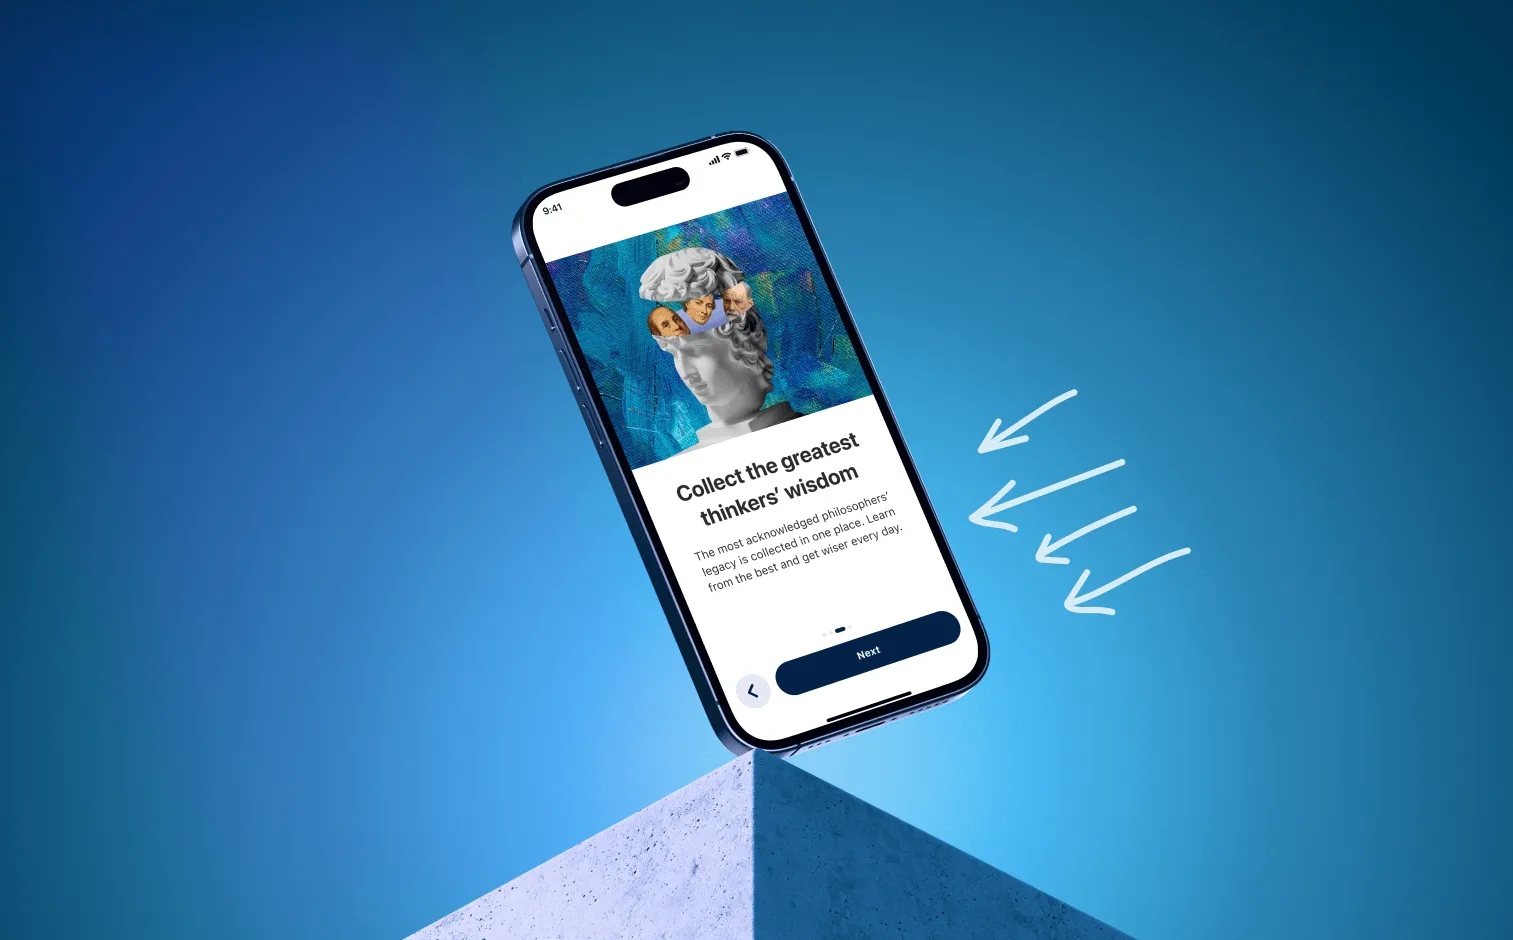
A walkthrough in apps is a guided tour that helps users understand the features and functions of a mobile app. It typically includes interactive elements such as text, images, and videos to demonstrate how to use the app and what it can do. The goal of a walkthrough is to provide an easy and efficient way for users to learn about an app and become familiar with its features. With a well-designed walkthrough, users can get up and running quickly and easily, enabling them to make the most of the app.
What is the Difference Between an App Walkthrough and a Product Tour
An app walkthrough is a series of steps that guide a user through a mobile application. It typically occurs when a user first opens the app and is designed to introduce the user to the application's features and capabilities. The walkthrough usually consists of a series of on-screen instructions and images that explain the app's interface and how to use it.
A product tour, on the other hand, is designed to provide an overview of an entire product or service. It typically consists of a series of slides or videos that explain the features and benefits of the product. Unlike an app walkthrough, a product tour usually does not include instructions on how to use the product, but instead focuses on providing an overview of what the product can do and how it can benefit the user. Product tours can be used to introduce a product to new users, as well as to educate existing users on the features and benefits of the product.
Why You Need Walkthroughs in Your App
Having an app walkthrough is beneficial for apps because it allows users to become familiar with the app quickly and easily. It provides a concise and comprehensive overview of how the app works and what it can do. It also serves as a great introduction to the app, showcasing its features and benefits. By walking users through the app in a step-by-step manner, they will be more likely to understand how to use the app and make the most out of it. Additionally, a well-crafted product walkthrough can help to increase user engagement and retention. By providing users with a detailed overview of the app’s features, they will be more likely to stick with the app and use it regularly. Furthermore, guided walkthroughs can help to reduce the amount of time that users spend trying to figure out how to use the app. With a clear and concise overview of the app, users can quickly learn how to use it without having to struggle through a complex user interface.
How to Create an App Walkthrough in 4 Steps
Test an Existing Feature's Adoption Experience
- Determine the size of the user base. This can be done by analyzing the number of downloads of the app and the number of users who have activated the feature.
- Measure engagement. This can be done by tracking how often the feature is used, how long users spend on the feature, and how often users return to the feature.
- Measure user satisfaction. This can be done by conducting surveys and interviews to get feedback from users about the feature.
- Measure the impact of the feature. This can be done by analyzing the data to see if the feature is leading users to take certain actions or if it is helping to increase user retention.
- Measure the return on investment. This can be done by analyzing the cost of developing and maintaining the feature as well as the revenue generated from it.
Design the App Walkthrough
- Develop a clear purpose and goal: Before you start designing an app walkthrough, it is important to determine the purpose and goal of the walkthrough. Consider why you are creating the walkthrough and what value it will provide to users.
- Create a storyboard: Once you have established the purpose and goal of the walkthrough, create a storyboard that outlines the steps users should take to complete a task. This storyboard should include screenshots, animations, and other visuals that will guide users through the process.
- Create a script: After you have created the storyboard, develop a script that explains each step of the walkthrough app. The script should include descriptions, instructions, and other relevant information that will help users understand and complete the task.
- Develop an engaging design: Design the user interface of the walkthrough with an engaging design that is easy to understand and navigate. Consider using visuals and animations that will help users understand the process and keep them engaged.
- Test and refine: After you have developed the design, test the walkthrough with users and collect feedback. Use this feedback to refine the design and make any necessary changes to ensure the best user experience.
- Launch: Once you have tested and refined the walkthrough, it is time to launch it to users. Monitor the usage of the walkthrough and collect feedback to continue to improve the user experience.
Build the Walkthrough with an App Walkthrough Tool
- Start by deciding what features you want to showcase in your product tutorial tour. Consider what features will be most important for users to understand and utilize when using your app.
- Create a script for each feature you want to showcase. Think about the best way to explain each feature and how to make it easy for users to understand and use.
- Design a graphic layout for your app walkthrough tour. This should include images and text that clearly explain each feature.
- Develop the tour using a tool such as Appcues. This will allow you to create interactive elements and animations to demonstrate each feature.
- Test the tour on multiple devices to ensure it works correctly on all device types.
- Launch the tour and monitor its usage to ensure users are understanding and utilizing the explained features.
- Iterate on the tour as needed to ensure users are getting the most out of your app.
Test Your Walkthrough
Testing an application walkthrough requires a comprehensive approach. The following steps can be taken to ensure the walkthrough is effective and easy to use:
- Plan: Outline the testing process, including what will be tested, when it will be tested, and who will be responsible for testing.
- Analyze: Examine the app's design, including the flow of screens, navigation, and interactions. Determine any areas that could be improved.
- Test: Execute the tests, using both manual and automated tests. Simulate user interactions and collect feedback from test users.
- Record: Document the results of the tests, including any areas that need improvement.
- Revise: Make any necessary changes to improve the app’s walkthrough based on the test results.
- Retest: Run the tests again to verify that the changes have had the desired effect.
- Validate: Ensure that the walkthrough is as effective and user-friendly as possible.
- Monitor: Monitor the walkthrough over time to identify any further improvements that may be needed.
What Not to Miss
Set the Right Goal
When setting goals for an app's walkthrough, it's important to focus on user experience and engagement. First, determine the primary goal of the app and establish a set of user objectives that need to be met in order to achieve that goal. Then, break down the objectives into smaller chunks and decide on the most effective way to present them to users. Consider the user's level of knowledge, the type of device they are using, and the overall design of the app when designing the in-app guide. Finally, ensure that the walkthrough is accessible and easy to follow, and make sure that users are able to complete the tasks that are presented to them.
Find Your App's Aha Moment
Finding an app's aha moment for an app walkthrough can be a challenging process. It is important to understand the app's user experience, its features and functions, and how it is used by the end user. To begin, it is essential to research the app and its competitors thoroughly. By understanding the user's journey, it is possible to identify the key challenges and pain points that the user may have when using the app. This understanding can then be used to determine the app's aha moments, which are the moments when the user is surprised, delighted, or finds a solution to a problem. Additionally, user feedback and surveys can be used to uncover the app's aha moments. By understanding the user's experience, it is possible to design an effective in app tutorial and identify the aha moments that can help to make the app more user-friendly and enjoyable.
Set the Targeting
When setting the targeting for an app's walkthrough, it is important to consider the different types of users that might interact with the app. The app walkthroughs should be tailored to the specific needs and interests of the target audience. For example, if the app is tailored to beginner users, the walkthrough should focus on the most basic features. On the other hand, if the app is more advanced, the walkthrough should focus more on the advanced features. Additionally, it is important to consider the language used in the walkthrough. If the app is international, it is important to use language that is easily understandable to all potential users. Finally, it is important to consider the length of the app walk through. It should be short enough to keep users interested but long enough to ensure that all important information is communicated.
How to Properly Test the Walkthrough
Stage Internal Testing
Internal testing for testing an app's walkthrough should involve a variety of stakeholders. This includes developers, designers, product owners, and other members of the team. Each should be given access to a version of the app and be asked to test it out and provide feedback. This feedback should include both positive and negative points, and should be focused on the user journey, usability, and overall look and feel of app tutorials. Additionally, the team should review analytics data related to the walkthrough, such as clicks, page views, and user engagement metrics. This data can help inform decisions about how to improve the user experience. Finally, the team should conduct usability tests with real users to ensure the walkthrough is easy to understand and use.
Create a Serial Testing Tour
A serial testing tour is an effective way to test an app’s walkthrough. To create a serial testing tour, first create a list of the steps in the walkthrough, in order. Then, assign each step a number, starting with 1. After that, assign a tester to each step, and ask them to carefully go through the step and note any issues or problems they find. Once all the testers have gone through their assigned step, move on to the next step in the list. Repeat this process until you have gone through all the steps in the walkthrough. Finally, compile the results from all the testers and review for any issues or problems that need to be addressed.
Use an A/B Testing Tour
A/B testing is an effective tool for testing an app's walkthrough. To use A/B testing for ain app tutorials, first create two different versions of the app's walkthrough. Each version should have different elements, such as different images, text, buttons, and so on. Once the two versions are created, randomly assign a set of users to one version or the other and track the differences in user engagement and success. Collect user feedback and analyze the data to determine which version of the walkthrough is more effective. Make adjustments and changes to the in-app tutorial based on the data collected, and repeat the testing process until the desired results are achieved.
Showcase Your App's Value Through an App Walkthrough
A walkthrough of an app is an invaluable way to show its value to potential users. Not only can it demonstrate the app's features and capabilities, but it can also provide insight into the user experience.
Ready to get started? Contact us and see how a custom-made walkthrough can help drive engagement and downloads.


